With iOS 11 last year, Apple (finally) introduced the ability to record your screen from the iPhone itself. Previously, you had to physically connect it to your Mac and then open QuickTime to do this. Not only is this a huge inconvenience, but it also limits screen recording options to a handful of users.
Of course, screen recording is still a niche feature – it’s useful for gaming vloggers, capturing errors for troubleshooting, recording videos without a download button, etc. But when you need it, there’s no substitute for the built-in options. If you’re on Android, unfortunately this isn’t an option, although there are some great free apps that can get the job done.
Apple’s native iOS 11 screen recording tool also supports microphone input, so you can add external audio to your clips. Once the recording is complete, you can view, edit, and share it through the Photos app. Here’s how to record your screen on an iPhone, iPad, or iPod Touch running iOS 11 or later:
How to record screen on iPhone, iPad, iPod Touch
1. Add “Screen Recording” in Control Center.
iOS 11’s screen recording feature doesn’t come as a standalone app, but instead offers a shortcut through your Apple device’s Control Center, which lets you quickly turn on airplane mode, change screen brightness, and turn on the flashlight.
Go to set up apps, then swipe up to find control center. Click to open it and select Custom controls. On the next page, swipe up to find screen recording Under the subheading “More Control.” Click the green round “+” icon to add the option to Control Center.
Control Center supports four icons per row. The placement of Screen Recording in the “Contains” subheading determines its location in Control Center.
Three Free Android Screen Recording Apps
2. Start recording screen.
First, navigate to the app you want to start screen recording. This will help reduce the editing required later.
Then, open Control Center by swiping up from the bottom edge of the screen, unless you’re using an iPhone X. On iPhone X, you can swipe down from the top right corner of the screen. If you’re using an iPad, you can also double-click the Home button.
Find the Screen Recording icon: it’s a larger circular outline with a filled circle inside it. Click the icon to start recording, and a three-second countdown will appear before starting. Once completed, the status bar will turn red.
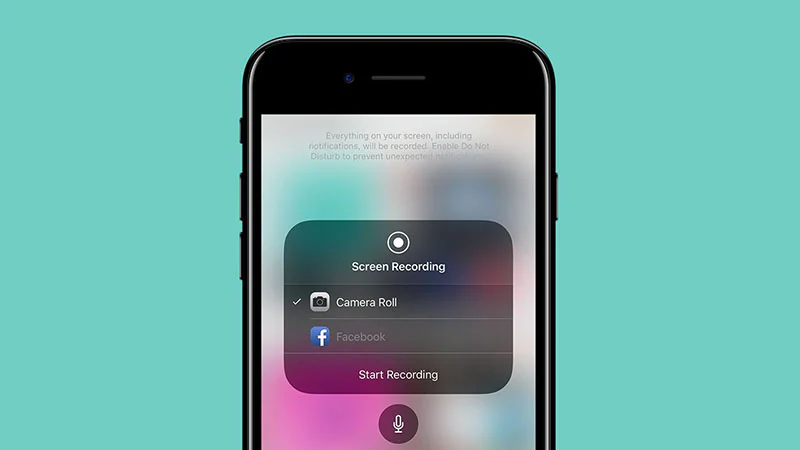
By default, screen recording on iOS 11 will capture the screen as well as any app’s sound. If you want to include room audio or voiceover, tap and hold/3D Touch the screen recording icon. In the new dialog box, click microphone audio button. It should then say “Microphone audio on”.
tap Start recording Start recording your iPhone/iPad screen.
3. Stop recording screen.
Once you are satisfied with the recording, there are two ways to stop it.
First, you can open Control Center and tap on the screen recording icon, which will be red. Or two, click the red status bar to pop up a dialog box, then click stop.
You can view saved recordings in the Photos app. There you can use edit Option to trim the video to your preferred length and save as a new clip. Feel free to upload and share your videos wherever you like, whether it’s Facebook, Twitter or Dropbox.
That’s all. If you have any questions about iOS 11 screen recording, please leave a comment below.
For more tutorials, visit our how-to section.

