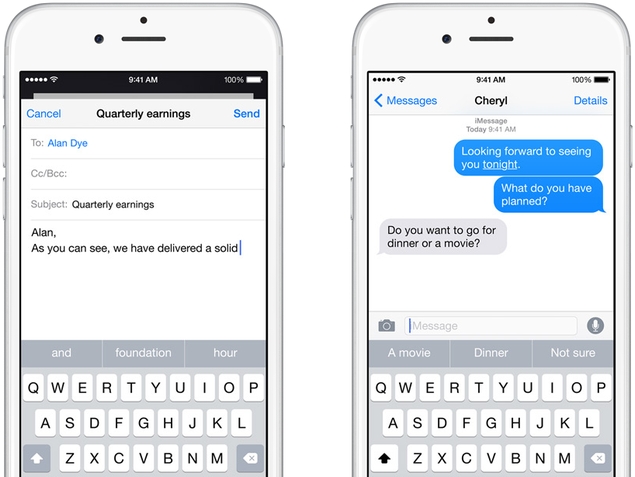
Prior to iOS 8, third-party keyboards on the App Store had to exist as standalone apps that allowed you to copy and paste text into emails or messages. Now, however, Apple allows third-party keyboards to be used in all apps and has also introduced a much-improved default keyboard – QuickType. Apple’s default keyboard now supports word prediction and takes context into account when showing suggestions. The day after iOS 8 was released, the keyboard app appeared at the top of both free and paid app lists in the App Store. If you’re eager to try these apps, here’s how to install, enable, and disable various keyboards on iOS 8.
(See also: Our favorite third-party keyboard apps on iOS 8)
Fast typing
At first glance, QuickType may look like an ordinary keyboard, but after you use it for a while, it starts to show its worth. It suggests words based on your typing style in different apps like Messages and Mail. If someone asks you a question like “Dinner or a movie?” QuickType will automatically suggest the words “dinner” and “movie.” Here’s how to enable or disable QuickType functionality.
1. On your iOS device, tap Settings > General > Keyboard.
2. Now scroll down and you will see several options such as AutoCorrect, AutoCapital, Check Spelling, Enable Caps Lock, and Predictive. Tap the switch next to each switch to enable or disable it.
3. If you don’t see predictions on your iOS 8 keyboard, make sure the switch next to Predictions is on.
4. You can also set keyboard shortcuts, such as typing “omw” for “on my way”. In the same menu, just click on the shortcut to configure it.
third party keyboard
We really like the QuickType keyboard, but some people want more features, such as slide typing. This is where new third-party keyboards come into play. Although these keyboards offer functionality not found in QuickType, there is a risk that the application will record and store your keystrokes. All apps claim they respect user privacy, but there is no way to verify this.
At the time of writing, we also encountered some issues with third-party keyboards. From time to time there will be lags or even freezes. These issues may be fixed in a future update, but if you don’t want to wait, here’s what you need to do to get these keyboards:
1. Go to the App Store and install your favorite keyboard app.
2. Open Settings > General > Keyboard > Keyboard.
3. Click Add new keyboard.
4. Select the keyboard you want to use from the list.
5. Click Edit at the top to change the order in which the keyboards appear. The main keyboard you want to use should be at the top.
6. Now open any application that allows you to enter content such as Messages or WhatsApp. Click the globe icon to switch between keyboards. Some keyboards, like Swype, require you to tap and hold the globe icon to switch between keyboards, but in most other apps we’ve tried, tapping the globe icon switches keyboards.
Apple has gone to great lengths to protect your data by not allowing full access to the keyboard unless you give them permission. A keyboard without full access cannot transmit data to its servers and therefore cannot record anything you type. Unfortunately, some keyboards will stop working if you don’t give them full access. Here’s how to grant them full access or disable it.
1. Go to Settings > General > Keyboard > Keyboard.
2. Select the keyboard to which you want to grant full access.
3. Slide the switch next to “Full Access” to “On.” To disable it, slide the switch to “Off.”
4. Full access is a keyboard-specific option, so you must enable or disable it individually for each third-party keyboard.
This covers how to use third-party keyboards on iOS 8. Do you prefer the default QuickType keyboard or use a third-party keyboard? Let us know in the comments. Be sure to visit our How To section for more tutorials.

